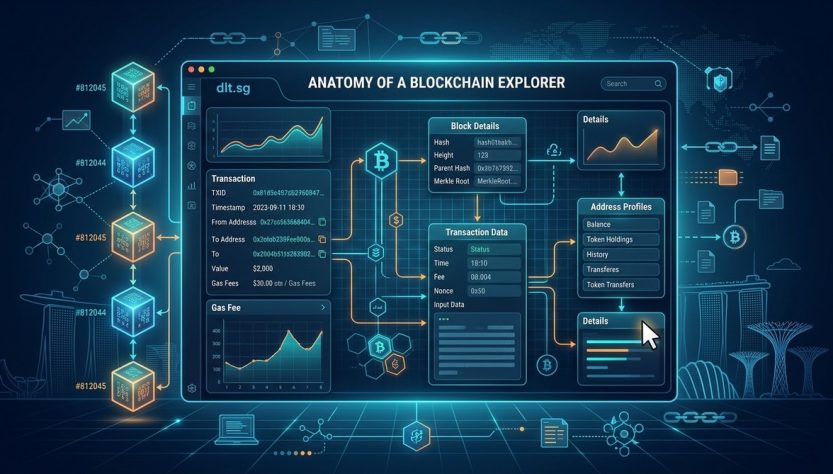
A blockchain explorer is the closest thing the crypto world has to a public search engine. It lets you look up any transaction, wallet, or smart contract and see exactly what happened. But if you have ever opened a page on Etherscan or Solscan and felt lost in a wall of hex codes and numbers, you are not alone. The data is all there, but it is not always obvious what to look at first. This guide will change that. By the end, you will know how to read blockchain data with confidence, whether you are tracking a payment, auditing a contract, or just satisfying your curiosity.
Reading on-chain data is a skill any crypto user can learn. Focus on three core pieces: the transaction hash, the sender and receiver addresses, and the amount plus gas fee. From there, you can verify confirmations, check token transfers, and spot common red flags like failed internal transactions or unusual contract interactions. Practice with small transfers first.
What Exactly Is a Blockchain Explorer?
A blockchain explorer is a web tool that reads the raw ledger of a public blockchain and displays it in a human-friendly format. Think of it like a public library catalog. Every block, every transaction, and every address is indexed and searchable.
Most explorers are chain-specific. You use Etherscan for Ethereum, Solscan for Solana, Mempool for Bitcoin, or BSCScan for Binance Smart Chain. Some multi-chain explorers like Blockscout let you switch between networks, but the layout is usually similar.
When you search for a transaction hash or a wallet address, the explorer pulls the latest state from the chain and shows you:
- The status (success, pending, or failed)
- The block number and timestamp
- The sender and receiver
- The amount transferred and the fee paid
- Any extra data, like token transfers or smart contract calls
If you are new to this, start by reading our guide on how distributed ledgers actually work. It covers the foundation that makes explorers possible.
The Five Parts of Any Transaction Page
Every transaction page, regardless of the blockchain, has a standard set of fields. Once you learn to spot them, you can read on-chain data on any network.
1. Transaction Hash (TxID)
This is the unique fingerprint of the transaction. It is a long string of letters and numbers, usually 64 characters long for Ethereum or 64 for Bitcoin. Copy it and paste it into any explorer to pull up the same record.
Think of it like a receipt number. No two transactions share the same hash. If someone gives you a TxID, you can verify exactly what happened.
2. Status
The status tells you whether the transaction is pending, confirmed, or failed. A pending transaction has been broadcast but not yet included in a block. Once it is confirmed, the explorer shows the number of confirmations (how many blocks have been added on top of it).
A failed transaction means the network rejected it, often because of insufficient gas or a reverted smart contract call.
3. From and To (Sender and Receiver)
These are wallet addresses. For a simple transfer, you will see one sender and one receiver. For complex contract interactions, you may see multiple internal addresses. Always verify that the “To” address matches the one you intended. This is the most common place for phishing mistakes.
4. Amount and Token
The explorer shows the value transferred, usually in the native coin (ETH, SOL, BTC) and sometimes in USD. If the transaction involved a token like USDC or an NFT, the explorer will list that under a separate “Token Transfers” section.
5. Gas Fee (or Transaction Fee)
This is the cost of getting the transaction into a block. On Ethereum, it is shown as gas used multiplied by gas price. On Bitcoin, it is a single fee in satoshis. High fees relative to the amount sent can be a red flag for spam or a poorly optimized contract.
To understand the underlying mechanics better, check out our breakdown of what happens when you send a blockchain transaction. It walks through the journey from your wallet to the ledger.
How to Read Blockchain Data in Three Steps
Let us walk through a real-world example. Imagine you sent 0.1 ETH to a friend and want to confirm it arrived.
Step 1: Find the Transaction Hash
Open your wallet (like MetaMask or Trust Wallet) and look for the transaction history. Click on the most recent transfer. The wallet will show you the TxID. Copy it.
Step 2: Paste It Into an Explorer
Go to Etherscan.io and paste the hash into the search bar. The page will load within a second or two. You should see the status field immediately. If it says “Success” and shows at least one confirmation, the transaction is final.
Step 3: Verify the Outputs
Scroll down to the “From” and “To” fields. Confirm the receiver address matches your friend’s address. Then check the “Value” field. It should show 0.1 ETH. Finally, look at the “Gas Fee” to see what you paid. If everything matches, the transfer is complete.
For more complex transactions that involve smart contracts, you may also see an “Input Data” section. That contains the raw function call and parameters. You can decode it using tools like the Ethereum Signature Database, but that is an advanced topic.
Common Mistakes When Reading On-Chain Data
Even experienced users make errors. Here is a table of the most frequent pitfalls and how to avoid them.
| Mistake | Why It Happens | How to Avoid It |
|---|---|---|
| Confirming the wrong transaction | You paste the wrong hash or look at a similar address | Always double-check the first and last four characters of the TxID |
| Misreading gas fees | You see a high fee and think the transaction failed | Check the status first. A high fee does not mean failure |
| Forgetting to check token transfers | You only look at the native coin balance | Scroll down to the “Token Transfers” section for ERC-20 or SPL tokens |
| Assuming pending means stuck | The network is congested | Wait for the next block. Pending is normal during high traffic |
| Ignoring internal transactions | A contract call creates multiple sub-transactions | Use the “Internal Txns” tab on Etherscan to see everything |
If you want to avoid these errors from the start, read our list of 7 common blockchain misconceptions that even tech professionals believe. It will save you from a few embarrassing moments.
What to Look For When Auditing a Smart Contract Interaction
Reading a simple transfer is one thing. But when you interact with a decentralized exchange or a lending protocol, the transaction page gets more crowded. Here is what to focus on.
- Method ID: The first four bytes of the input data tell you which function was called (for example, swapExactTokensForTokens).
- Event Logs: Most explorers show emitted events. Look for Transfer events to see tokens moving in and out of your wallet.
- Approval and Spending: If you approved a token spend (approve function), you will see a transaction where you are the sender and the contract is the receiver of approval. The actual swap happens in a second transaction.
- Revert Reasons: If a transaction fails, the explorer often shows a “Revert reason” string. It might say “insufficient output amount” or “transfer amount exceeds balance.” This tells you exactly why the contract rejected the call.
For a deeper look at how contracts execute, read our guide on how smart contracts actually execute on ethereum virtual machine.
A Practical Checklist for Scanning a Transaction
When you need to verify a transaction quickly, run through this bulleted list.
- Status shows Success or Confirmed
- At least one block confirmation (more for high-value transfers)
- Sender address matches your wallet
- Receiver address matches the intended recipient
- Amount matches what you expected (including decimals)
- Token transfers list the correct token symbol and quantity
- Gas fee is within normal range for that network
- No unexpected internal transactions or approvals
If any of these checks fail, pause and investigate before assuming the transaction is correct.
Advanced Tips for Power Users
Once you are comfortable with the basics, you can use explorers for more than just checking transfers.
Track whale movements. Watch large wallet addresses to see when major holders move funds. This can give you early signals about market sentiment.
Monitor new token launches. Use the “Contract Creation” filter on Etherscan to see every new contract deployed on Ethereum. Many scams start here, but so do legitimate projects.
Check for MEV (Maximum Extractable Value) activity. On Ethereum, you can see if a transaction was included by a builder or if it was frontrun by a searcher. Look at the “Block Proposer” field on the block page.
Verify cross-chain bridges. If you bridged tokens from Ethereum to Arbitrum, use the explorer on both chains to confirm the lock and mint events. The source chain should show a burn, and the destination chain should show a mint.
For enterprise readers, understanding on-chain data is critical for compliance. Read our article on how enterprise blockchain consortia are reshaping supply chain transparency to see how this skill applies in a business setting.
Why Reading Blockchain Data Matters More in 2026
The blockchain ecosystem has grown far beyond simple peer-to-peer transfers. In 2026, on-chain data powers real-world asset tokenization, decentralized identity systems, and institutional-grade settlement networks. Regulators in Singapore, the EU, and the US expect companies to monitor on-chain activity for compliance. Being able to read this data is no longer a nice-to-have. It is a core competency for anyone working in crypto, finance, or enterprise technology.
Singapore, for example, has become a global hub for blockchain innovation. The Monetary Authority of Singapore encourages companies to use public ledgers for transparency while maintaining regulatory oversight. If you operate in this region, understanding on-chain data is essential for navigating the local framework. Learn more about how Singapore’s monetary authority is shaping southeast asia’s digital asset future.
Putting the Explorer to Work
The best way to learn is to try it yourself. Send a small amount of crypto between two wallets you control. Then look up the transaction on an explorer. Walk through the five parts we covered: hash, status, addresses, amount, and fee. Repeat the process a few times until it feels natural.
Once you master the basics, you will be able to audit any transaction, spot anomalies, and make informed decisions about where your assets go. That is the real power of knowing how to read blockchain data.
“The blockchain does not lie. But it does not explain itself either. Learning to read the raw data is like learning to read a bank statement. Once you know the format, you can verify everything yourself.” — DLT Singapore Research Team
If you want to go further, our guide on why do blockchains need consensus mechanisms explains how the data you read gets its finality. And if you are curious about the building blocks themselves, read what exactly is inside a blockchain block.
Your Next Step Toward On-Chain Literacy
You do not need to be a developer to read blockchain data. You just need to know where to look and what each field means. Start with small, personal transactions. Verify every step. Soon, you will be able to scan a transaction page in seconds and know exactly what happened.
The blockchain is transparent by design. Take advantage of that transparency. Open an explorer, paste a hash, and start reading.